31 March 2008

Du bon vin pour vos recettes/Would you like some wine with that?

Ce week-end il y avait le Salon des Vins des vignerons indépendants à Paris (oui, avec le Salon du Livre, ça fait deux salons dans un mois -- pas très simple pour le budget... mais tellement de bons achats !).

This weekend there was a fair for small independent viticulturists (um, aka wine makers) in Paris, and, although I spent way too much money already at the Salon du Livre this month, it's only twice a year! There are so many good wines to discover to accompany my culinary experiments.

En arrivant, avec D., nous sommes allées directement au stand du Domaine Tancrez, où nous avons l'habitude d'acheter au moins une caisse de leur François 1er 2004 (la dernière fois c'était pire puisqu'il y avait une promo pour les membres : 12 bouteilles achetées, 6 offertes, et nous avons joyeusement cédé à la tentation, mais cette fois nous étions un peu plus sages - enfin, à peine, vous allez voir). Nous avons aussi goûté le François 1er 2005 et, bien qu'il soit encore un peu jeune, nous sommes heureuses de savoir que quand il n'y aura plus de la cuvée 2004, ou que cela sera trop cher pour nous, il y a un autre très bon vin (très différent, mais très bon) qui sera prêt à prendre le relais. :-) La très gentille exposante du domaine Tancrez nous a aussi vendu 2 bouteilles de leur Insolite (un pinot noir extraordinaire, issu de vieilles vignes de 90 ans, que nous avons pris la dernière fois), alors que normalement elle voulait vendre sa dernière caisse en un seul lot. Mais on était tellement triste de penser qu'on aurait plus jamais ce vin, et elle nous ne voulait pas nous voir déçues comme ça.

First stop, Domaine Tancrez, a wine maker we discovered at our first Salon and we just keep coming back for their François 1er 2004. We bought a case :-) I mean I know that sounds bad, but last time it was worse! They had a sale for members: buy 12 bottles, get 6 for free, and we couldn't pass it up! The woman who runs the stand is really sweet and she even accepted to sell us two bottles of a her last case of a pinot noir called "Insolite" made from vines that are 90 years old! She was hoping to sell the last case all together, but we were so sad that she gave in and broke it open ;-)


Next, we tried some Crozes Hermitage wines and some muscat (a sweet wine that's often drunk either before a meal or with dessert). D. even bought me a bottle of muscat "oxydatif" (whatever that is) from Corsica because I fell in love with it, though it was a bit expensive. Is this coming out snobby -- I hope not! I've become Frenchified, ack!

Après, c'était les Crozes Hermitage, et les muscats (D. m'a même fait cadeau d'un muscat "oxydatif" corse que j'ai adoré, mais qui était un peu cher :-)). Et finalement, alors qu'on allait partir, (mais j'insistais, je savais qu'on avait pas tout à fait fini,) c'est là que D. a vu notre coup de coeur de cette année -- Chateau de Briante. Nous avons goûté leurs Brouillys et avons été très convaincues ! Nous avons acheté deux bouteilles du Brouilly Tradition 2004 et une bouteille de la Baronne 2005 à redéguster tranquillement chez nous, mais c'est sûr que nous y retournons au prochain salon ! Ils ont même un blog, et une rubrique pour suggérer des recettes pour accompanger leurs vins ! Tous pour nous plaire.

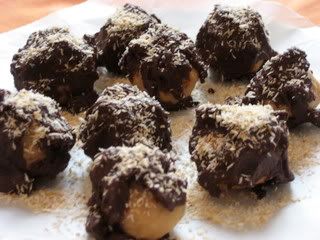
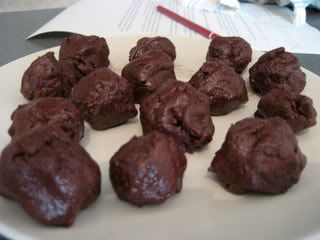
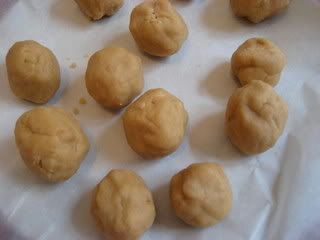
En rentrant, nous avons fêté tous ça avec du gâteau moelleux au vin rouge et à la cannelle !

Then, as we were on our way out, and I was protesting, no, no I don't think we're quite finished yet! D. saw Chateau de Briante: look Brouilly wines, let's try that stand! What a wonderful find. We really liked all the wines we tasted at the stand, plus the viticulteur was really nice and passionate about his wine so it was fun. He even has a blog about his wines with recipe suggestions! We bought 3 bottles to retaste over the next 6 months, but we'll definetly be going back there at the next fair!

Back at home, and in from the rain, we celebrated with some red wine chocolate cake...what else?!

30 March 2008

Peanut Butter Chocolate Balls and Window Cleaning

So here we are, D. and I, official owners of our very own 2 bedroom apartment in the 18th arrondissement ! Er, well I should say it WILL be a 2 bedroom apartment, but currently it's one heck of a mess (hence our ability to afford it). Now we have the major job (along with the builder who will be doing things we can't like demolishing and rebuilding walls), of redoing the apartment in the next few months. What does this have to do with recipes, Hopie, you ask? It's not like we come here to hear your life story!! Get to the chocolates! (Ok, see what happens: when you don't leave comments, I'm forced to make up conversations with you...not good!)

Well, I'm getting to that. So, for our first day of apartment work, the mission was to bring something to snack on that could be a reward for hard work, but also keep us going strong all Sunday afternoon. I've been meaning to test these Peanut Butter Chocolates from Jill at Simple Daily Recipes for a while and I thought, chocolate = reward, peanut butter = energy, this is PERFECT!

Unfortunately, I'm not quite as talented in the chocolate department as Jill because instead of coming out smooth and beautiful with that cute drip-dollop on top, mine came out all bumpy, saved only in a appearance by the toasted, shredded coconut I sprinkled on:

my pb/coconut chocolates

Where did I go wrong?? Well I mean, I didn't follow her recipe exactly, but I COULDN'T! Not all of the ingredients can be bought in France (chocolate chips for example). Even peanut butter is super expensive and imported from the US. And then, of course I had to add my own touches... :-)

Mostly I had problems with the chocolate. I could tell that the first batch I melted was not the right consistency and I think that had to do with the mix of shortening and chocolate I used. I quickly shaped it into balls so as not to waste:

Then, I melted some more chocolate, this time just with a little water, which turned out better, but, OH NO, I overcooked it -- clumpy again! So I just globbed it onto my poor chocolates anyway... And it was delicious, if not very aesthetic.

So here's my adaptation; I'm hoping you'll have better chocolate karma than I.

Peanut Butter Chocolate Balls
(I made 1/2 Jill's recipe because I didn't have room in my fridge for more, but you can always redouble it.)

Ingredients:
1/2 cup crunchy peanut butter (I like having the peanut bits in it!)
1 Tbsp peanut or other oil
1/2 cup flour
1/2 cup powdered sugar
2 Tbsp margarine, softened
200g/7 oz semi-sweet baker's chocolate
1 Tbsp shortening
wax paper
1/4 cup shredded coconut, toasted (if you don't know how to toast it, refer to this entry)

Mix with and electric mixer, or cream well with a fork: peanut butter, oil, flour, powdered sugar, and margarine (you can leave out the oil if your peanut butter is very oily, or if you use creamy peanut butter). Finish with your fingers to form a ball of dough.

Line a plate or cookie sheet with wax paper. Using about 1 tsp of dough each time, roll into balls and place on wax paper. Chill in fridge until dough becomes firm (I did about 1/2 hour, but Jill says as little as 15min might work).

On low heat, or in a double boiler, melt the chocolate with the shortening. AS SOON AS it's melted, remove from heat and dip in peanut butter balls with the help of a fork. Coat evenly with chocolate (if you can!) and place back on wax paper. Use a small spoon to sprinkle toasted coconut on top and refrigerate until chocolate sets (10-15 minutes). Then stick them in a Tupperware and take them apartment redoing with you!

I spent three hours cleaning these windows and window frames that hadn't been cleaned in about about 10 years!! Thanks peanut butter chocolates!

29 March 2008

Soupe au poulet pour affronter les giboulées de mars

In English here.
Oui, d'accord c'est la fin du mois de mars déjà, mais il y a une petite différence culturelle (où peut-être climatique, nous allons voir ça tout de suite) : en anglais nous parlons d'
April showers, averses d'avril, pour évoquer les pluies de printemps sous lesquels tout le monde attrape la crève pour rester au lit jusqu'aux "fleurs de mai". Et oui, car dans l'expression anglaise, les averses en avril amènent des fleurs en mai :


Alors que pour vous, les Français, il y a les giboulées de mars. Vos printemps commencent-ils plus tôt que les nôtres ? Ou peut-être durent-ils plus longtemps ? Et qu'est-ce que les giboulées de mars amènent ? Encore de la pluie pour avril ? Pas très sympa de leur part... Enfin, si vous en avez marre de la pluie et de renifler tout le temps (qu'importe le mois), je vous propose cette soupe au poulet pour vous réchauffer le corps et vous mettre de meilleure humeur.

Pause culturelle : Alors qu'en France la soupe fait grandir, aux Etats-Unis la soupe, et plus particuliairement la soupe au poulet, guérit les rhûmes !

Soupe au poulet

Ingrédients :
1 c.s. huile d'olive

2 oignons

2 carottes
1/2 à 1 c.s. hot curry
1/2 c.s. sauge

2 gousses d'ail, pelées et écrasées
1 litre plus 1 verre de bouillon (ou d'eau avec 1 cube de bouillon)
2 pommes de terre

1 blanc de poulet rôti (ou deux cuisses si vous préférez) coupé en dès (personellement, j'utilise les restes d'un poulet rôti quand j'en ai pour ma la soupe, mais vous pouvez aussi bien mettre du poulet cru et le cuire dans la soupe. Dans ce cas, mettez le poulet au début juste après les épices, et avant d'ajouter le bouillon)
sel, poivre
Chauffer l'huile d'olive dans une casserole. Peler, couper, et ajouter oignons et carottes. Cuire 2-3 minutes en remuant souvent, ajouter curry, sauge, et ail, remuer et cuire encore quelques minutes. Ajouter le bouillon et porter à ébullition. Pendant ce temps, peler et couper les pommes de terre en dès, et les ajouter à la soupe bouillante avec le poulet.

Baissez le feu, couvrir et laisser mijoter environ 20 minutes (jusqu'à ce que les pommes de terre soient cuites). Saler, poivrer et servir chaud avec une bonne baguette !

Cette soupe est encore mieux le lendemain, quand tous les ingrédients ont bien mariné...

27 March 2008

Taking (uh, I mean making) Stock

This weekend since I was sick, I asked my dear D. to buy me a roast chicken because 1. it's one of my favorite comfort foods, 2. it doesn't require a lot of energy to prepare (just cut off the pieces you want), 3. it makes more than one meal easily, and 4. chickens are roasting and smelling yummy at every corner butcher's, and D. was going right past my favorite (halal) butcher (I don't know what prayers he says over his meat but I'm 100% in favor because it's darn good!).

After cutting all the meat off the chicken, I was heading to the trash with the bones when I thought NO! STOP! Why waste? I can make chicken stock with them...never mind that I don't have a stock pot; never mind that my kitchen is the size of a (big) closet, and my freezer the size of a postage stamp, I'll just go ahead and do it. So, I made a small batch, and I might try roasting my vegetables first next time for a richer flavor, but it was not bad at all, all things considering.

The good thing about making your own stock is that it makes you feel very thrifty and if you're a New Englander born and bred (like me), you'll know how important that is! If you're well organized, you can use tons of stuff that you would throw away otherwise.

Thrift Tip: Wash your veggies before peeling them for cooking and save the peels, skins, ends, etc. in a freezer bag in the freezer for stock-making day.

Er, what's this picture Hopie's showing us? Her trash? Her compost bag? Nope, it's possible chicken or veggie stock additions to keep in the freezer, sillies.

So how to make stock? There are a million variations, but here's a place to start for the basics.

Chicken Stock

1 chicken carcass or a bunch of bones
water to cover (about 16 cups)
3 onions, roughly chopped
2-3 carrots, washed and roughly cut
2-3 stems celery (with leaves), ditto
3 cloves garlic, peeled and cut in half
5 whole peppercorns
1 bay leaf
1 branch rosemary
1 branch thyme
(you can use a bouquet garni for the herbs if you feel up to making one)

(Keep in mind, you can use scraps too, and the leaves of the celery, the carrots, etc. if you like. The gloves are off, go crazy! You're going to filter it afterwards. You just want about as much water as solids.)

Put the chicken bones in a large (stock) pot, and cover with water. Bring to a boil and simmer uncovered 2-3 hours, skimming off impurities regularly.

See, this foamy stuff is an example of what to skim off.

Add vegetables and herbs, bring back to a boil, and simmer uncovered 2 hours, skimming off impurities once every hour. Once you're done simmering, strain the stock into another pot (Joy of Cooking, my personal bible in the kitchen says to strain it through cheesecloth. I didn't have any so I just used a strainer, but the stock came out cloudier as a result -- so if you do have cheesecloth, go for it!), and place the pot with strained stock in a sink filled with cold water and ice cubes (this allows the stock to cool down quickly so you can refrigerate it without raising the temperature of your fridge). This is important because it's not good to leave the stock out for too long to collect bacteria. Refrigerate a couple hours, skim the fat off the top and use your stock or freeze it.

Healthy Stock Tip: You can freeze some stock in ice cube trays and use a cube of stock instead of butter or oil to stir fry with, or add to sauces.

For Vegetable Stock:

-Omit the chicken. (Yea, you probably figured that out on your own.)
-Use the same vegetables as for chicken stock PLUS whatever other ones you want to add. (I'm a fan of leeks in stock, for example.)
-But you can also try: mushrooms, corn, squash, potatoes, etc.
-Watch out for: tomatoes (unless you want a very tomato-y broth), and relatives of the cabbage which are overpowering as well.
-Simmer your veggie stock for about 1 hour. Unlike meat stock, which needs to be reduced, veggie stock doesn't and doing so can make the stock bitter.
-Strain, cool, and freeze for later use!

If you're still worried, read this very helpful article by Camille.

To help you use your stock try this Chicken Soup recipe.

24 March 2008

Substitutions

I've been thinking about conversions, as I do often while cooking in Paris, (although I haven't posted about it since my early measurement conversions post) and I thought it might be helpful to list some common ingredients that are not found in France or the USA and what I use to substitute. I'm sure this will be an ongoing project, and I will make posts as I think of things. Or, if you have substitution or conversion questions or suggestions, don't hesitate to let me know!

En écrivant ce blog bilingue, je suis souvent confrontée, non seulement à des conversions de mesure, mais aussi à des problèmes de substitutions d'ingrédients que l'on ne trouve pas dans un pays ou dans l'autre. Voilà quelques petits trucs de base qui peuvent aider les cuisiniers internationaux ! Si vous avez des questions ou des suggestions, n'hésitez pas à m'en faire part. J'ajouterai forcément des conversions et substitutions au fur et à mesure que je teste de nouvelles recettes.

nothing to do with conversions, just another pretty spring picture from Amy / rien à voir avec des conversions, encore une jolie photo d'Amy pour encourager le printemps

Cream cheese = St. Morêt

Baking powder = Levure chimique

Vanilla extract = Arôme de vanille ou sucre vanillé

Brown sugar = Cassonade ou sucre roux ou sucre cuivré

Maple syrup or molasses = miel (non, ce n'est pas pareil, mais cela marche)

Crème fraîche = Sour cream or mascarpone cheese or whipping cream + 1 Tbsp buttermilk

Poitrine fumée = Bacon

Emmental = Swiss cheese

And lastly, some useful conversion resources for international cooks / Et enfin, quelques liens utiles pour les conversions de mesures et de températures de four :

OnlineConversion.com

English French Food Dictionary

Cuisine France Conversions

23 March 2008

Sunday - no baking

spring crocuses photo courtesy of Amy

First of all, happy Easter to those who celebrate it today. My Easter recipes will be on Greek Orthodox schedule -- which is a whole month later this year. Unfortunately, since I've been sick this weekend, there won't be any Sunday baking today (good time to browse, dig up recipes you haven't tried). But I imagine if you're celebrating Easter, you're done with your baking (no??), and if it's just another Sunday for you, well, sleep in, relax, and then go smell some flowers, 'cause spring is on the way!

22 March 2008

Cuisine un peu si tu l'oses


Cela fait un petit moment que je suis le blog de Joanna, Je ne suis pas une courge. Vous vous souvenez peut-être de son fameux gâteau au vin rouge et au chocolat... tellement bon !

Donc, le week-end dernier, j'ai profité du Salon du Livre pour regarder les livres de recettes et acheter (entre autres) son livre. Mais, alors que je m'apprête à faire le marché pour prendre de bons ingrédients et tester des recettes, voilà que je tombe malade ! Quelle frustration !

Donc, pas de recettes ce weekend, mais vous mangerez peut-être des bons plats en famille pour Pâques, qui sait, et vous pouvez espérer des nouvelles recettes sans faute la semaine prochaine. Bon week-end !

20 March 2008

Gratin dauphinois au saumon fumé

In English here.
Trois raisons :
Petite chute de température à Paris, qui donne des envies de plats chauds et reconfortants.

Des tranches de saumon pas trop chères au supermarché.

Une des spécialités de D.K. est le gratin dauphinois au saumon (à tomber par terre).

Une conclusion : Demander gentiment que l'on me le fasse ce plat, manger, manger et poster la recette pour que vous vous régaliez aussi :-)

Dauphinois au saumon fumé

Ingrédients :

500g de pommes de terre
4 tranches de saumon fumé
4 c.s. de crème fraîche
1 boursin / fromage aux fines herbes
1 c.s. huile d'olive
du vin blanc

1. Eplucher et couper les pommes de terre en lamelles. Faire cuire à l'eau bouillante 15 à 20 mn jusqu'à ce qu'elles soient cuites.

2. Pendant ce temps, mélanger dans un bol la crème fraîche et le fromage.

3. Préchauffer le four à 210C.

4. Arroser le fond d'un plat à gratin avec de l'huile d'olive et étaler une première couche de pommes de terres, une de couche saumon fumé, et une couche de mélange crème fraîche, fromage. Recommencer pour la deuxième couche.

5. Arroser le tout généreusement de vin blanc et mettre au four pendant environ 15 mn. Servir chaud (avec une salade verte en accompagnement, si vous voulez).

Demandez à quelqu'un qui vous aime de faire la recette (ou faites-la pour quelqu'un que vous aimez), et c'est encore mieux !

More comfort food - potatoes au gratin with smoked salmon

En français ici.
Well the temperature here has gone back down after a couple days of warmer weather last week. (Actually the weather's been highly schizophrenic - reminds me of New England, although less cold for the time of year of course.) So, I've been craving warming, comfort food again, and have convinced D.K. to make one of my favorite dishes, a cheesy potato dish with smoked salmon. It's a twist on a typical french dish that we call potatoes au gratin, and that the French call gratin dauphinois. Luckily for us, D. has agreed to share this recipe that I might, if I felt like living on the edge (which I do), call gratin delphinois. ;-) Enjoy!

Gratin Delphinois

Ingredients:

7-8 med. or large potatoes
4 slices smoked salmon
4 Tbsp crème fraîche (if you can't find crème fraîche, I would suggest sour cream for this recipe)
1 boursin cheese or other cheese with herbs
1 Tbsp olive oil
about 1 glass white wine

1. Peel and cut the potatoes into round slices. Cook in boiling water 15-20 minutes until tender.

2. Meanwhile mix together the crème fraîche (or sour cream) and the cheese in a bowl.

3. Preheat the oven to 375F.

4. Oil the bottom of a baking pan and spread a first layer of potatoes, followed by a layer of salmon and then a layer of the cream and cheese mix. Repeat this process for the second layer and pour white wine over the top. (You can serve the rest of the bottle with dinner!)

5. Cook in oven for about 15 minutes and serve hot (with a green salad if you like).

Spring is coming, I'm sure it is! But until then, stay warm.

19 March 2008

Madeleines amande-cannelle

In English here.
Matinée éprouvante aujourd'hui, mais no fear je connais le moyen de me remonter le morale, et me décontracter - c'est cuisiner, bien sûr ! (qu'est-ce que vous croyez ?)

Et comme c'est l'heure du thé, et un peu tôt encore pour m'intéresser au dîner, je refais ma recette de madeleines amande-cannelle que j'ai faite pour le Salon du Livre dimanche dernier (et dont j'avais partagé la recette en anglais). J'en profite pour poster la version française, à l'attention de mes lecteurs pour qui le mystère des cups et tablespoons reste obscur.

Attention : je ne prétends pas, en tant qu'Américaine, détenir la "vraie" recette des madeleines, et encore moins la recette de ma grandmère (qui ne cuisinait même pas d'ailleurs) comme certains français pourraient le faire, mais je propose quand même ma version, que j'ai créée après avoir acheté de la poudre d'amande par accident. Ensuite, j'ai juste ajouté les trucs (terme technique culinaire) qui, je pensais, iraient bien ensemble.

Madeleines amande-cannelle

150g beurre
2 oeufs
150g sucre (j'ai utilisé de la cassonade)
zeste d'un petit orange
1/2 c.c. arôme de vanille (ou 1 c.c. sucre vanillé si vous préférez)
150g farine
60g poudre d'amande (en fait, j'ai utilisé la moitié d'une barquette de 125g)
1 sachet levure chimique
1 c.c. cannelle

Fondre le beurre à feu doux ou dans le micro-onde.

Battre les oeufs avec le sucre et le zeste d'orange jusqu'à ce que ça soit un peu mousseux sur le dessus. Ajouter l'arôme de vanille et battre de nouveau.

Ajouter farine, poudre d'amande, levure chimique, et cannelle SANS MELANGER. Une fois tous les ingrédients verser, mélanger un peu les ingrédients secs dessus, avant de mélanger le tout, en ajoutant le beurre fondu.

Remplir les moules à madeleines (beurrés) et passer au four (200C) pendant 10 à 15 minutes jusqu'à ce que le dessus des madeleines soit doré.

Et voilà une journée qui s'améliore nettement :-)

16 March 2008

Sunday Baking: Almond-Cinnamon Madeleines

En français ici.
I spent my weekend at the Salon du Livre here in Paris, a huge 5-day fair of publishers, authors, editors, bookstores and everything related to books. As a result, cooking was down to a minimum, just the essentials for a picnic like these sandwiches, which I made yesterday with ham, sun-dried tomatoes and avocado, and today with ham, goat cheese and avocado. Both were infinitely better (if I do say so myself) and less expensive than the food sold at the fair. But what about a little something to snack on during a pause in book-browsing, you ask? True, meeting authors and buying books and checking out the new (and actually frighteningly seductive) technologies for future reading make one awfully hungry!

Soooo, this morning it was chained-to-the oven until I came up with the perfect baked good for the event. The result:

Almond-Cinnamon Madeleines


- 10 1/2 Tbsp butter (yea, I know, but I actually measured in grams - 150g, nice and round, see?)
- 2 eggs
- 3/4 cup sugar
- zest of a small orange
- 1/2 tsp vanilla extract
- 1 cup flour
- 1/4 cup almond powder (finely ground almonds)
- 1 tsp baking powder
- 1 tsp cinnamon

1. Preheat the oven to 375F.
2. Melt butter in a small pot on low heat, or in the microwave.
3. While butter is melting, whisk the eggs and sugar together in a bowl until foamy on top.
4. Add orange zest and vanilla extract and whisk to blend them in.
5. Without stirring, add the flour, almond powder, baking powder and cinnamon. Stir the dry ingredients a bit on top first. Then fold them into the wet ingredients, adding the melted butter.
6. Pour into greased (or silicone - if you have a cool sister who gave you silicone molds for Christmas) madeleine tins and bake for 10-15min, until madeleines are golden-brown on top.


They're perfect for a goûter, a picnic (indoor probably at this time of year) or afternoon tea with a good book (they go well with books - I tested!).


Divine light (or at least light from above) inspires my madeleines in my otherwise utterly uninspiring "oven" (basically the size of a toaster oven).

15 March 2008

Salon du Livre - Sandwiches pour pique-nique

Aujourd'hui, ma mission était de préparer les sandwiches pour le Salon du Livre, un événement presque religieux pour D.K. (et puis, soyons honnête, je suis un petit peu accro aux livres moi aussi, même si je parle plutôt de cuisine ici). Comme la nourriture est chère et pas très bonne au hall d'exposition, on voulait venir équipé ! Et puis, dépenser beaucoup d'argent en livres, et rencontrer des écrivains intéressants, célèbres ou pas encore, cela donne faim !

C'est là que je me suis souvenue "tiens ! j'ai un nouveau livre de recettes de sandwiches", et je me suis fortement inspirée d'un de leurs sandwiches pour faire les nôtres :


Pour la recette, c'est simple à réaliser, mais cela change un peu du jambon-beurre habituel. Pour deux sandwiches :

une baguette
beurre
moutarde forte
4 tranches de jambon
une petite boîte de tomates séchées
1 avocat
sel, poivre

1. Couper une baguette en deux (ou couper le pain selon la taille du sandwiche que vous voulez).
2. Beurrer d'un côté et étaler de la moutarde forte sur l'autre.
3. Plier et ajouter 2 tranches de jambon par sandwiche.
4. Saler, poivrer.
5. Couper les tomates séchées en lamelles et ajouter aux sandwiches.
6. Couper l'avocat en deux, ôter le noyaux, couper en lamelles et ajouter un demi avocat par sandwiche.
7. Fermer les sandwiches, emballer de papier aluminium et emmener avec vous où vous voulez (mais, je vous conseille fortement le Salon du Livre, tout de même !!).

14 March 2008

Pretty plate of food / Une assiette sympa

So in a recent post, I made fun of my other half's attempts at dinner, which was a little bit unfair on my part.
Il y a quelques posts, je me suis gentiement moquée des talents culinaires de ma chère moitié. Ce n'était pas entièrement juste, et j'aimerais me ratrapper en vous montrant la photo du beau dîner que l'on m'a fait hier soir.

So I would like to make up for it by posting a picture of the beautiful meal I was presented with last night :


Des tartines : jambon, chèvre; hummous, tomates jaunes; et beurre, comté, pickle (un condiment britannique).
Open sandwiches: ham and goat cheese; hummus and baby yellow tomatoes; and butter, comté cheese and "pickle" (no, not pickles; "pickle," a British veggie spread).


Dinner included opening a bottle of red wine (perhaps, all an elaborate ruse to get me to make my red wine chocolate cake again? Which worked by the way...).
Tout cela avec une bouteille de rouge, que l'on n'a pas fini et j'étais forcée de refaire le gâteau moelleux au vin rouge et à la cannelle ce matin !

13 March 2008

Comfort Coconut Noodles

En français ici.When I saw a recipe for Spicy Coconut Noodles on Tea's cooking blog, I was seduced by it's use of coconut milk. Yes, I find coconut milk...attractive ;-) You'd just have to take a look at the kitchen cabinet after a sale on coconut milk at the supermarket to know what I mean. D. doesn't see WHY we need to buy enough coconut milk to feed an army on...well, coconut milk, let's say, but is soon dissuaded from making fun when I make recipes like this!

This recipe might look exotic, but it's the new comfort food around here for those rainy, cold, windy days we've been having a lot recently. Just trust me and give it a try. You'll see.

Comfort Coconut Noodles
(4 servings)

8oz rice noodles
13.5oz can coconut milk
3 Tbsp tomato paste
1/4-1/2 tsp cayenne pepper
1 small chili pepper, cut into thin round slices
1 tsp salt
1 cup cubed chicken or tofu
2 Tbsp lime juice (or to taste)
1/2 cup bean sprouts (optional)
1-4 chopped scallions (depending on size)
leaves from 3-4 branches fresh mint, shredded or chopped
1/4 cup shredded coconut, toasted

Cook noodles, according to the directions on the package and drain.

Meanwhile, in a large saucepan over medium heat, combine coconut milk, tomato paste, cayenne pepper, chili pepper and salt. Bring to a boil and add the chicken or tofu. Turn down heat, and simmer until chicken is cooked (about 10min) or tofu is warmed through (about 5min). (If using tofu, you might want to brown it first in a little butter or oil to make the texture more interesting, but it's up to you.)

While the chicken or tofu is simmering, you might take this time to toast the shredded coconut in a dry frying pan, stirring until light brown. Once chicken or tofu is cooked, add lime juice and noodles to the saucepan and toss. Serve noodles and top with bean sprouts (if using), scallions, mint and shredded coconut.

Taste, eat, and serve second helpings ;-)

Vermicelles de riz à la noix de coco

In English here.
Les journées pluvieuses de mars sont venues en force ici à Paris, et c'est d'autant plus déprimant que, de temps en temps, il y a des éclaircis et l'on commence à espérer... et puis non, encore de la pluie. Exemple : quand je suis partie de chez moi hier, il faisait beau, donc j'ai pris un vélib. Mais à moitié chemin, il a commencé à pleuvoir des cordes, sans prévenir, et j'étais trempée avant de pouvoir garer le vélo et descendre en métro, et tout ça pour arriver en cours 20 minutes plus tard avec un beau ciel bleu. J'en ai marre !

Ou, plutôt, j'en avais marre avant de découvrir une version de cette recette sur un des blogs de cuisine que je lis. Pour Tea, c'était une façon de combattre le "blues" de février, mais un mois plus tard, c'est toujours aussi efficace !

Voilà mon adaptation :
Vermicelles de riz à la noix de coco
(pour 4 personnes)


- vermicelles (ou autres pâtes) de riz pour 4 (j'ai utilisé 2 petits paquets, mais la quantité dépend des marques, il faut regarder les indications sur le paquet)
- une boîte (40cl) lait de coco

- 3 c.s. de double concentré de tomates
- 1/4-1/2 c.c. de piment de cayenne

- un morceau de piment vert (2cm), coupé en rondelles fines

- 1 c.c. sel
- 2 blancs de poulet, coupés en dès

- 2-3 c.s. jus de citron vert
- une poignée germes de soja (facultatif)
- 1 à 3 cébettes (selon la taille)

- les feuilles de 3 à 4 branches de menthe fraîche hachées

- 8 c.s. noix de coco râpée, grillée dans une poêle sans ajout d'huile ou de beurre

Cuire les vermicelles selon les indications sur le paquet et égouter.


Entre temps, mettre le lait de coco dans une grande casserole à feu moyen. Ajouter le double concentré de tomates, le piment de cayenne, le piment vert, le sel, et mélanger. Porter à ébullition, ajouter le poulet, baisser le feu et laisser cuire environ 10mn, jusqu'à ce que le poulet soit cuit.


Ajouter le jus de citron vert et les vermicelles. Servir et parsemer de germes de soja (si vous les utilisez), de cébettes, de menthe et de noix de coco râpée.


Cela ne prend pas très longtemps à réaliser, et vous allez vous sentir tout de suite mieux, malgré le météo, croyez moi :-)

12 March 2008

Other places to find good cooking

I know what you're saying to yourself : I LOVE Hopie's Kitchen, but what do I do on the days Hopie doesn't post. I need my cooking fix!! Well...I've recently had the pleasure of joining two blogrolls exclusively for cooking blogs.

Click to Join the GREAT COOKS! Blogroll


and

Click to Join the Foodie Blogroll! A growing community of foodie blogs.


To get your recipe dose for the day, just click on the links and take a look around! There are lots of cooking blogs, general and specialized, with tons of yummy ideas. And if you have a cooking blog yourself, you should join!

10 March 2008

Petits tartes amande-figue

In English here.
Pour ma rubrique Sunday Baking cette semaine, j'ai posté un email que j'ai reçu de ma soeur cadette -- une nana très forte en patisserie, croyez-moi ! -- dans lequel elle partage une de ces recettes du moment : des tartelettes amande-framboise (que j'ai transformé en amande-figue). "Ca a l'air de rien comme ça," elle précise, "mais une fois que l'on commence à les manger, on peut plus s'arrêter !" Mais je vous laisse juger.

Voilà la traduction/adaptation pour mes lecteurs français :
Ingrédients pour la pâte :

- 170g de beurre, ramolli (autant dire qu'il faut y penser à l'avance !)

- 150g de cream cheese américan (si vous êtes puriste) OU de St Morêt puisque c'est beaucoup plus facile à trouver et ça marche aussi.

- 225g de farine


Ingrédients pour la garniture :
- confiture de figue (ou de framboise, ou ce que vous voulez)
- 200g de pâte d'amande

- 3 jaunes d'oeuf
- 50g de farine

- 3 c.s. de lait

- 1 c.s. de jus d'orange (j'en avais pas, donc j'ai utilisé du jus du mangue)

- 1 c.s. de jus de citron
- 1/2 c.c. arôme de vanille (vous pourriez aussi utiliser du sucre vanillé si vous préférez)


1. Mélanger bien le beurre et cream cheese (ou St. Morêt) avec un batteur électrique ou une fourchette.

2. Ajouter la farine et continuer à bien mélanger. Former une boule avec la pâte, et emballer-la avec un emballage plastique ou du papier aluminium. Laisser reposer dans le frigo 1 heure.
3. Diviser la pâte froide en boules d'environ 2cm et disposer chaque boule en l'aplatissant dans un moule à tartelettes (étaler bien partout, au fond et sur les côtés).

4. Préchauffer la four à 210C.

5. Mettre 1 c.c. de confiture au fond de chaque moule.
6. Râper le plus finement possible la pâte d'amande et mettre dans un bol. Ajouter les jaunes d'oeuf un par un en mélangeant après chacun.

7. Ajouter farine, lait, jus d'orange, jus de citron et arôme de vanille et mélanger bien.

8. Mettre une c.c. de garniture au-dessus de la confiture dans chaque tartelette (ne pas en mettre trop, sinon le démoulage sera difficile !).

9. Cuire au four 15 - 20mn, ou jusqu'à ce que la garniture soit gonflée et dorée.

10. Laisser refroidir 10mn avant de démouler; puis laisser refroidir encore avant de manger.

C'est très bon à l'heure de thé :-)

09 March 2008

Sunday Baking - Mini raspberry (or fig) almond tarts

En français ici.
My littlest sister is a bit of a genius when it comes to baking. Well, she's a bit of a genius in general I have to say (proud big-sister moment), but when it comes to desserts: cookies, cakes, scones etc., she's definetly got it down. So, when I asked her if she had any recipes she was enjoying lately, and she sent me this recipe for "Miniature Raspberry Almond Tarts", I ran to the kitchen and started making them (well, I had to get a few ingredients first, but honestly I didn't even wait 'till my next shopping day)! Of course I made some of my own adjustments, substituting some yummy fig jam made by D's mother, rather than raspberry...

For Sunday Baking today, I'm posting a copy of her email (in italics), complete with her suggestions (in red), and my suggestions (in purple, as per usual). Got all that? Here we go!

Hopie,

This is from Odense.com. Odense is a company that makes almond paste, conveniently in tubes that are JUST the right size for their recipes. I hate to succumb to such blatant advertising, but it's hard not to when the recipes are so delicious. :-)

This recipe made two batches of muffin-top sized tarts for me.

Ingredients for crust:
12 Tbsp butter (
1 1/2 sticks) at room temperature (so plan ahead a little)
2/3 cup cream cheese, softened
1 1/2 cups all-purpose flour

Ingredients for filling:
1/3 cup red raspberry preserves (
Here's where I used fig jam, yum)
7 oz. almond paste (don't know if you can get Odense in Paris, but in America it should be in the baking aisle -
you can't, i used 200g of some very colorful almond paste that I DID find in the baking aisle)
3/4 cup sugar
3 large egg yolks
1/3 cup all-purpose flour
3 Tbsp milk
1 Tbsp fresh orange juice
(I didn't have any, I used mango juice)
1 Tbsp fresh lemon juice
1/2 tsp vanilla extract

Equipment:
(but don't worry too much if you don't have exactly this stuff)
mini cupcake pans
electric mixer
box grater

1. Mix butter and cream cheese
(with electric mixer or a fork) until well-combined.
2. Add the flour and mix again until blended. Shape into a ball. Flatten, wrap well in plastic and refrigerate for one hour.
3. Divide chilled dough into 1" balls. Press the balls into the bottoms and up the sides of the tart pans, forming the shells
4. Preheat oven to 400F. Place about 1 tsp raspberry (
or fig, or other) preserves into the bottom of each shell.
5. Grate the almond past. (Hope, the original recipe says you should grate it on the large-hole side of a box grater and then mix it in a food processor, but if you don't have one -
I don't - you should grate the paste as small as possible and use the electric mixer - or a good fork.)
6. Add the egg yolks one at a time, mixing well after each addition.
7. Mix in flour, milk, orange juice, lemon juice and vanilla extract until smooth.
8. Spoon filling on top of jam. (Hope, there's a temptation here to put in a lot of filling, -
true! - but you have to keep it within the shell or the tarts will fall apart when you take them out - also the filling will bubble over and stick the tarts to the pans mercilessly!)
9. Bake for 15 minutes or until puffed and a deep golden color.
10. Cool tarts on wire racks for 10 minutes. Remove tarts from pans and keep cooling on racks.

One more note: these often don't look very appetizing, but they taste DELICIOUS, especially with milk. Many times I've had people look at them rather askance until they try them, and then they always want more.

Yesh chsey uur dulisouch! What? Sorry, my mouth was full of yummy mini tart.
I don't know if you all noticed, but you only use the egg yolks in this recipe...and you know what that means... it'll be meringues for me this week!! ;-) Two desserts in one. Oh, so good.
Happy baking!


06 March 2008

Soupe au poulet à l'indienne

In English here
Pour mes 21 ans, il y a quelques années, ma mère m'a offert un cours de cuisine indienne dans une épicerie fine près de mon université...

C'était ma première expérience de la cuisine indienne (enfin, en tant que cuisinière, cela faisait déjà longtemps que je l'appréciais faite par d'autres gens). Depuis, j'ai pas mal éxploré les currys, et j'ai souvent fréquenté les épiceries indiennes, mais récemment je suis revenue à cette première recette dont j'avais gardé un très bon souvenir. Je n'étais pas déçue ! Voilà ma traduction / adaptation française de cette soupe velouté aux lentilles rouges.

Soupe au poulet à l'indienne


Ingrédients :
350g de lentilles rouges

50cl de bouillon (ou 50cl d'eau et deux cubes de bouillon)

1 c.c. curcuma

2 pommes de terre

5 gousses d'ail, pelées et hachées
un morceau de gingembre (environ 2cm), pelé et haché

25cl d'eau (ou de lait de coco)
2 blancs de poulet
2 1/2 c.s. d'huile d'olive
2 c.c. cumin
2 c.c. coriandre
1/4 - 1/2 c.c. piment de cayenne

2 c.s. jus de citron


- Mettre le bouillon, les lentilles rouges et le curcuma dans une grande casserole. Porter à ébullition, couvrir et baisser la température. Cuire à feu doux environ 20mn.

- Pendant ce temps, éplucher les pommes de terre, les couper en petits dés et mettre de côté. Couper le blanc de poulet en dés, mettre dans un bol et ajouter du sel et du poivre. Mélanger et mettre de côté.

- Une fois que les lentilles rouge sont cuites, ajouter les pommes de terres, recouvrir et continuer à cuire à feu doux jusqu'à ce que les pommes de terres soient tendres (encore une vingtaine de minutes).

- Pendant ce temps, chauffer l'huile dans une sauteuse. Ajouter l'ail, le gingembre, le cumin, le coriandre et le piment de cayenne. Continuer à remuer pour faire dorer les épices, puis ajouter le poulet et saisir environ 3 minutes. Ajouter l'eau (j'avais un peu de lait de coco que j'ai utilisé au lieu de l'eau la dernière fois, avec de bons résultats !), porter à ébullition, baisser le feu, couvrir et laisser cuire le poulet 7-10mn.


- Quand les pommes de terre sont cuites, mixer la soupe si vous avez envie d'une soupe bien lisse, et ajouter le mélange de poulet et d'épices. Ajouter le jus de citron et goûter l'ensemble pour vérifier l'assaisonnement. Si la soupe est trop épaisse, vous pouvez ajouter du bouillon ou de l'eau.


- Mettre dans des bols, garnir si vous voulez, et DEGUSTER ! :-)

Indian (Chicken) Mulligatawny Soup

(En français ici.)
For my 21st birthday, my mom gave me a gift certificate for a cooking class at this amazing gourmet deli, Putnam Market, near Skidmore College where I was earning my degrees in French and Creative Writing.

The theme of the class was Indian Food, and, although I've since gotten very into cooking Indian and have a lot of the basics down, I recently came back to this, one of my first ever Indian-recipe experiences. This soup is absolutely delicious, can be made very spicy or not, with chicken or vegetarian. It seemed very complicated to me at the time, and I've simplified it some, although it still takes a little patience... well worth it though!

Chicken Mulligatawny Soup

Ingredients:
2 cups split red lentils
8 cups chicken (or vegetable) broth
(or 8 cups water and 2 cubes chicken or veggie bouillon)
1 tsp turmeric
2 potatoes
5 cloves garlic, peeled and minced
2 inch piece fresh ginger, peeled and grated or minced
1 cup water (or coconut milk)
2 chicken breasts, boneless and skinless or boned and skinned
2 1/2 Tbsp olive oil
2 tsp ground cumin
2 tsp ground coriander
1/4-1/2 tsp cayenne pepper
2 Tbsp lemon juice

- Combine the lentils, chicken stock and turmeric in a medium-sized pot and bring to a boil. (I actually bring water to a boil in a kettle - which is faster - and then pour 8 cups of it over the 2 cups of lentils - once the pot is hot - and add the bouillon and turmeric.) Turn down heat, cover (leaving lid slightly ajar) and simmer gently for about 20 min.

- Meanwhile back at the farm...(er, while the soup simmers), peel the potatoes and cut into small pieces and put aside. Cut the chicken into 1 inch pieces, put into a bowl, sprinkle salt and pepper on it and toss. Put aside. After the soup has cooked about 20 min., add the potatoes and re-cover, simmering until potatoes are cooked (about another 20min.).

- During the second simmering period, heat olive oil in a large frying pan, add the chopped garlic, ginger, cumin, coriander, and cayenne. Fry, stirring continuously, until the spice mixture starts to brown. Put in the chicken pieces and stir another few minutes until the chicken starts to firm up. Add 1 cup water (I had some extra coconut milk lying around and substituted it for the water with yummy results) and bring to a boil. Cover, turn down heat and simmer 7-10mn until the chicken is cooked.

- Once the potatoes are done, remove soup from heat and purée it if you want everything nice and smooth. Then pour in chicken and spice mixture. Add the lemon juice. Taste for seasonings. If it's too thick you can add broth or water to thin it out.

- Put in bowls (garnish with cilantro, if you can stand the stuff, or perhaps parsley if you're like me) and EAT IT!


***For the VEGETARIAN or VEGAN version, cook the potatoes in the spice mixture instead of the chicken and add them to the soup only at the end. They may take a bit longer to cook than the chicken and/or need a bit more water.

04 March 2008

Nouvelles recettes à venir / exciting new cookbooks!


When I came across Simply British online, a French cookbook with new and revisited British classics: Irish stew, roast beef and potatoes, crumble and scones for teatime, I knew I HAD to have it! Quand j'ai vu ce livre de recettes sur le web, Simply British, annonçant que la cuisine britannique avait "fait son come-back, un vrai rebirthing !", j'étais intriguée. Et quand j'ai lu : "Découvrez le fameux irish stew (agneau mijoté, pour ceux qui ne sont pas à la page), le kedgeree, le mash, les trifles et crumbles... hum... britannique, vous avez dit britannique ?" j'ai failli crier à haute voix, sans épargner les voisins, OUI!! J'AI DIT BRITANNIQUE!

And then, oh dear (!) I'm a sucker for Amazon's silly deals, and I thought, Simply British plus Sandwiches (another book by the same authors) for only 15 euros -- I mean, I LOVE sandwiches! Result : I have two new cookbooks I can't wait to start experimenting with. :-) Et, bon, ils sont forts chez Amazon car ils m'ont proposé Simply British avec Sandwiches, un livre des même auteures, pour 15 euros... et j'adore les sandwiches... et puis c'est presque l'été, non ? Pique-niques? Tout ça, non ?

Pour vous mettre l'eau à la bouche / Some teasers for your drooling pleasure: Soupe aux petits poids à la menthe (garnie de lardons), Pea soup with mint, cottage pie, trifle...

Envisagez les pique-niques... / Think picnic... : Fromage de chèvre, jambon cru et figues /Goat cheese, prosciutto and fresh figs; poulet à la mangue /chicken and mango; cheddar et chutney...

02 March 2008

Sunday Baking - Red wine chocolate cake


This week, my Sunday baking recipe is adapted from another cooking blog that I enjoy reading. Seeing as I had a bit of wine left at the bottom of the bottle today, I tested Johanna's red wine chocolate cake (with my own touch) and was extremely happy with the results.

Pour mes lecteurs français, je vous encourage à explorer le site de Johanna : Je suis pas une courge ("le blog de tous ceux qui ne savent pas encore qu'ils savent cuisiner"), et plus particulièrement à tester son gâteau moelleux au vin rouge et à la cannelle. Je l'ai fait avec 4 c.s. de cacao et d'eau chaude, et j'ai saupoudré de sucre glace ! Un vrai régal.

This cake is sinfully easy to make, and doesn't require hard-to-find ingredients (especially now that I've adapted it for stuff you find in America). It comes together in 10 minute (15 max) and cooks for 20-30. No sooner you decide you MUST have it, than it's practically made! Perfect for those gray sick-of-winter days in March: wine cake, a nice cup of tea or coffee, a book.... sigh.

Ingredients:

-1 cup salted butter
-4 eggs
-1/2 cup sugar
-1/4 brown sugar lightly packed
(Note : she uses a type of granulated brown sugar called 'cassonade' -- see photo -- I propose a mix of white and brown to get the same taste and consistency in the US, but you can look for caster sugar if you like)
-1 tsp vanilla extract
-1 1/3 cup flour
-2 tsp baking powder
-1/2 cup red wine (she says go ahead and use the cheap stuff -- although she's talking about cheap French wine...which is not so cheap in America ;-) so it's up to you)
-1 tsp cinnamon
-4 Tbsp unsweetened cocoa diluted in 4 Tbsp hot water

1. Preheat the oven to 325F.
2. Melt the butter (on the stove on low heat or in the microwave)
3. In a large bowl, whisk together the eggs, sugar and vanilla extract until you get a small layer of foam on top.
4. "Dump" all the other ingredients on top (as Johanna would say) - including the melted butter.
5. Mix until smooth and pour into a greased cake pan. You can use whatever fun mold you're partial to. I simply used an 8X8 square baking dish -- AND I forgot to grease it, but it came out fine.
6. Cook at 325F for 25-30 min: top a bit crunchy, and the middle, nice and spongy.


I sprinkled the cake with powdered sugar when serving, which was yummy. :-) Happy baking.